D-Link patch (FEC, SWaP, CP, CID)
Thanks to -XTR3M3- for creating the base for this how to and Yalmac for translation. This article is based on this work, but not linked in any way directly to the original author.
Patch files are different for each FW version. Make sure that you use the correct patch files for your unit.
Before reading this, check SD Activator by Congo & Duke.
| SWaP patch for | CP off patch for |
|---|---|
| MST2_US_AU_P0504D | |
| MST2_EU_AU_P0673D | |
| MST2_EU_AU_P0840D | |
| MST2_EU_AU_P0962D | |
| MST2_EU_VW_P0213D | MST2_EU_VW_P0213D |
| MST2_EU_VW_P0225D | |
| MST2_EU_VW_P0227D | |
| MST2_EU_VW_P0231D | MST2_EU_VW_P0231D |
| MST2_EU_VW_P0624D | |
| MST2_EU_VW_P0628D | |
| MST2_EU_VW_P0635D | MST2_EU_VW_P0635D |
| MST2_EU_VW_P0640D | MST2_EU_VW_P0640D |
| MST2_EU_VW_P0642D | MST2_EU_VW_P0642D |
| MST2_EU_VW_P0757D | |
| MST2_EU_VW_P0867D | MST2_EU_VW_P0867D |
| MST2_EU_VW_P0870D | |
| MST2_EU_VW_P0876D | MST2_EU_VW_P0876D |
| MST2_EU_VW_P0879D | MST2_EU_VW_P0879D |
| MST2_EU_VW_P0891D | MST2_EU_VW_P0891D |
| MST2_EU_VW_P9122D | |
| MST2_US_VW_P0635D | |
| MST2_US_VW_P0867D | |
| MST2_US_VW_P0879D |
How do I recognize a MST2 Delphi Unit?
-
Delphi Units are always standard devices (
MST2) and not high (MHI2) devices. -
Accordingly, a Delphi unit is always a MIB2 Discover Media or MIB2 Composition Media and not a Discover Pro type unit.
-
All Delphi Units are Discover Media or Composition Media devices. But not all Discover Media and Composition Media devices are Delphi Units! It can also be a Technisat/Preh unit.
-
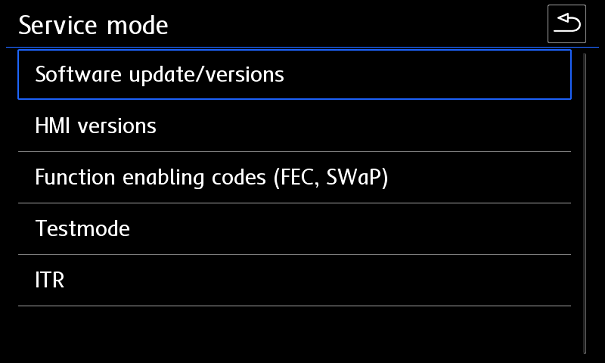
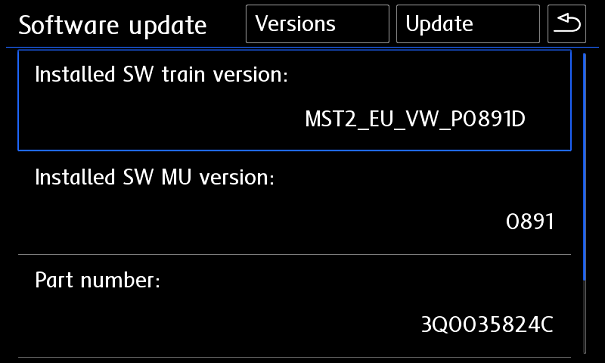
To recognize the unit without removal, it is necessary to hold down the MENU button on the radio for 3 seconds to open hidden service mode. In this menu go to
Software Update/Versionsand checkSW Train.
-
Delphi SW Train Version scheme example:
MST2_EU_VW_P0891D.\n


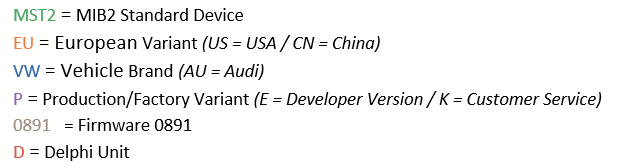
If there is a D at the end of your SW Train version, you have a Delphi Unit.
If you see a PQ or ZR after the vehicle brand or a T at the end in your SW Train version, then you have a Technisat Preh Unit.
Requirements - What do you need?
- Delphi MST2 unit,
- Diagnostic tool to enable Developer Mode (
VCDS,VCP,OBD11…), - Quality SD card (how to test SD card),
- Ethernet-USB adapter supported by the unit (D-Link DUB-E100 or alternative),
- Ethernet cable,
- Patch files from mibsolution.one.
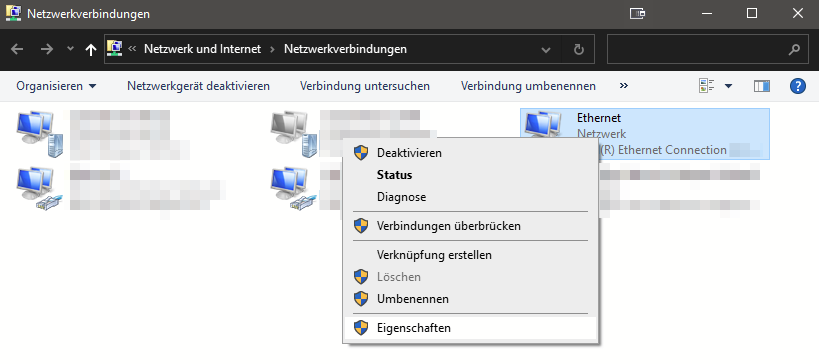
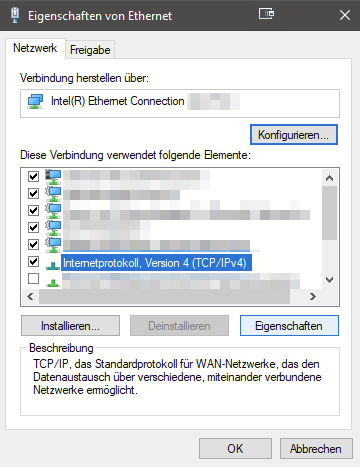
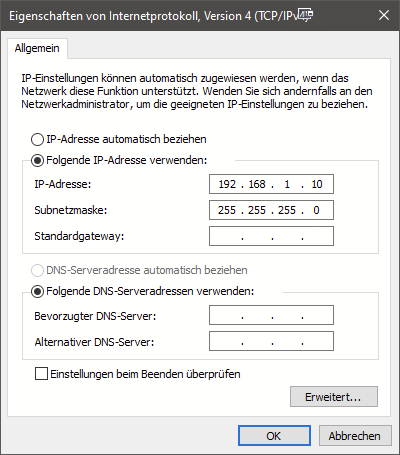
Network settings
Software-Version
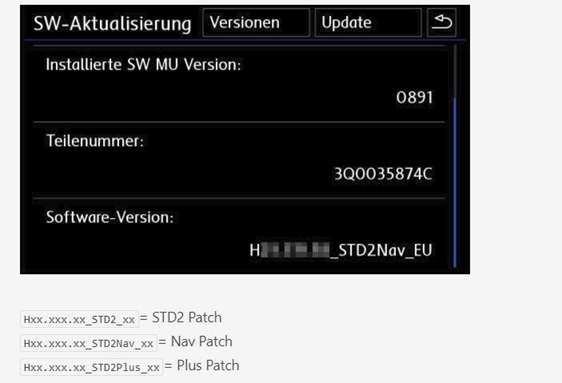
The patch files are different for each SW-Train and software version! \n Therefore, make sure that you use the right patch files for your unit!
If you use the wrong patch files, you will brick your unit in the worst case!
In addition to the SW-Train mentioned in the first section, there is also the software version, which can be read at the end of the same menu item.
Activate Developer mode and GEM
Activate the Green Engineering Menu (GEM) with VCDS, OBDEleven, VCP, or any other diagnostic interface.
Check: 5F - Enabling Developer Mode and Hidden Menu for more details.
Update FW
Train**In the ~~08xx~~ series, the firmware updates have not always been released ascending order.
The ~~0891~~ is not the latest firmware, but ~~0879~~ is!
P9122D (MU0842) ➔ P0867D (MU0867) * ➔ P0890D (MU0890) ➔ P0891D (MU0891) ➔ P0876D (MU0876) * ➔ P0879D (MU0879) **
* = Telnet is not activated on this FW
**= there is a modified firmware (MST2_EU_VW_P0879D-wTelnet) on the mibsolution.one server with telnet activated. Read in the folder oft this FW: patch\howto.txt !!!
Downgrade/upgrade to a version supporting telnet and or having an available patch
Run FW update
-
Format SD card to FAT32.
-
Copy firmware update files to the SD card.
-
Insert the SD card into the SD card slot 1.
-
Remove all other SD cards and USB devices!
-
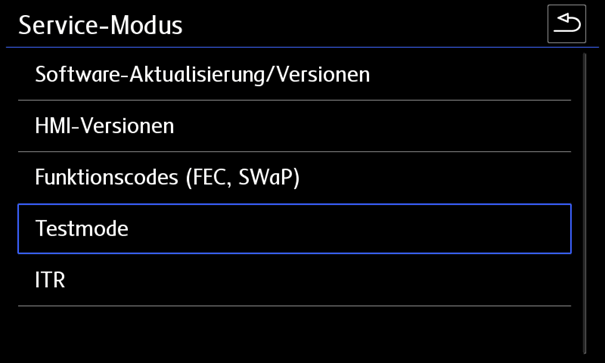
Press the MENU button on the radio longer until another (service) menu opens. Select the test mode there.
-
Switch to the "SWDL" category.
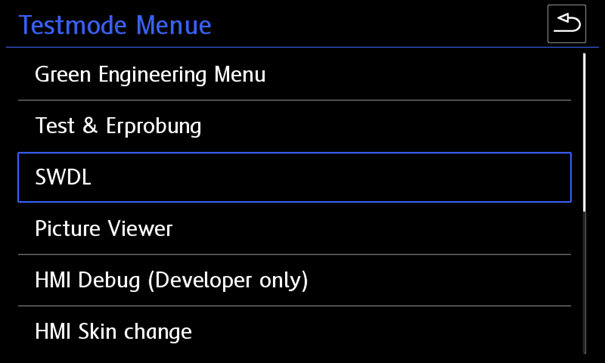
-
Activate Software Download Manual Download and tap "Start Download".
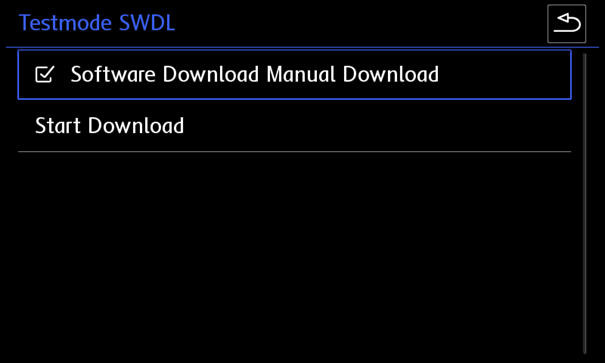
-
Select source (SD card), select everything and start firmware update.
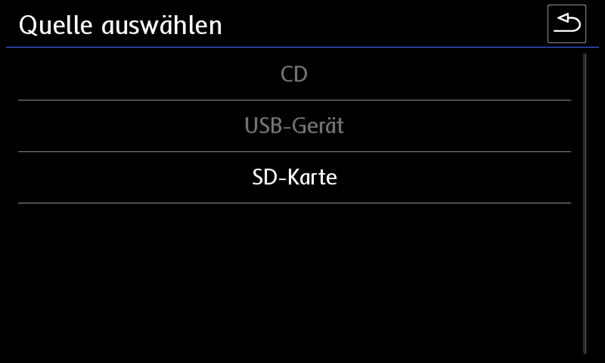
What should be considered when updating the firmware?
• Leave the ignition on
• Turn off unnecessary consumers (lights, ventilation, ...)
• Connect charger(at least 15A charging power, better 20A and more)
• Depending on the unit (RAM/CPU), the update takes 20 to 60 minutes
Fix Software Version Management (SVM) error
Use VCDS / OBDEleven / VCP to clear the erroro from unit.
TELNET Connection
Ethernet must be activated in GEM to enable telnet access.
Enable ethernet
Hold down the MENU button on the radio until the Service menu appears.
Navigate to Testmode
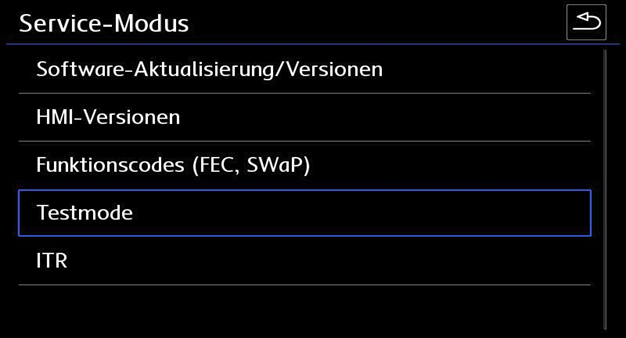
Select Green Engineering Menu
(optionally you can also get there directly by pressing the MENU button for a very long time)
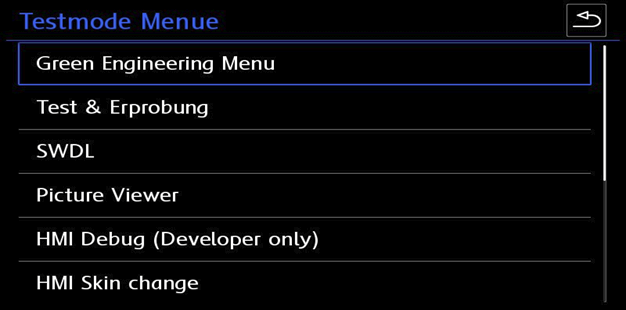
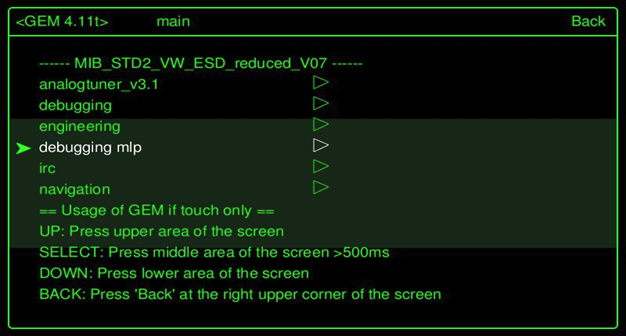
Change to the category "debugging mlp"
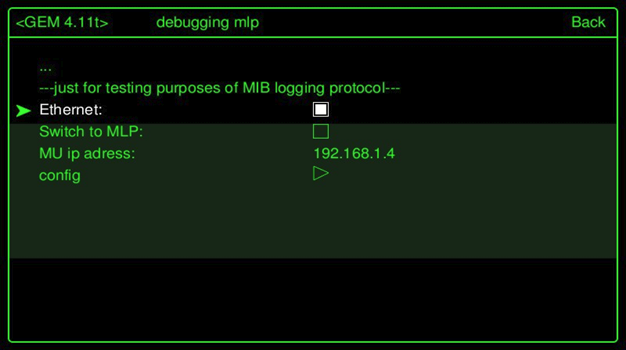
Check Ethernet box and restart the unit (hold down the power button for at least 10 seconds)
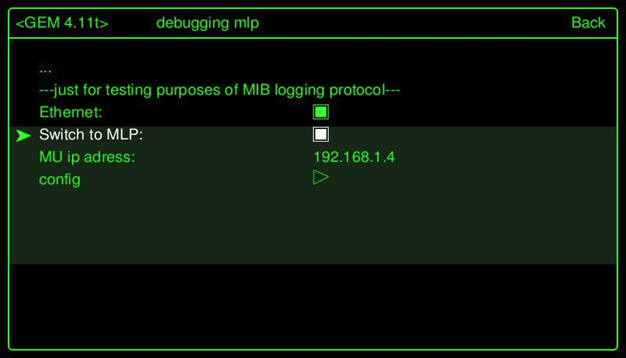
After the unit has been restarted enter same menu again and also check Switch to MLP must be checked. (Note: If only removing CP, it does not seem MLP needs to be selected 8/7/2023)
Connect with Putty - Telnet
Now the USB-LAN adapter can be connected to the USB port in the vehicle and connected to the laptop via LAN cable. If the LEDs othe adapter light up, if the cabling and network configuration on your PC/notebook are correct.
Putty can now be started.
The IP address is taken from the GEM menu debugging mlp.
IP 192.168.1.4 and port 23 are default on all units.
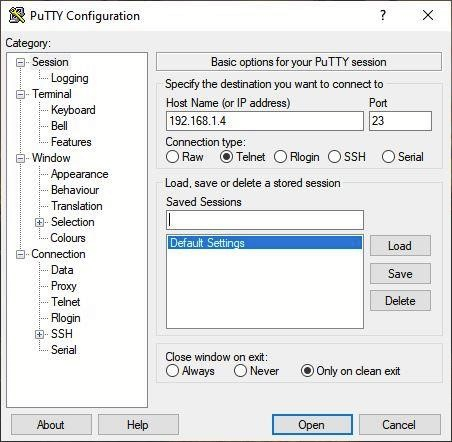
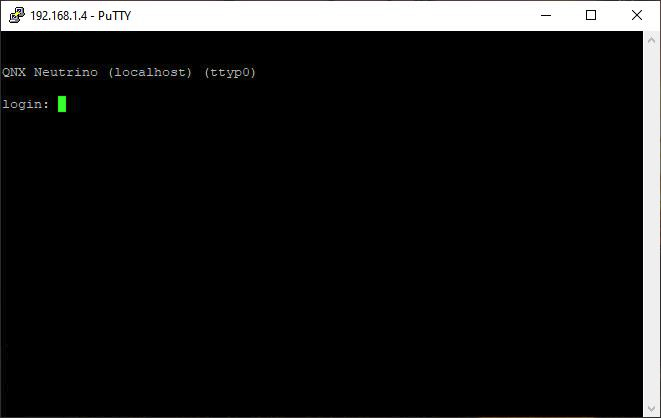
If everything has been configured correctly, you can tell from the QNX Neutrino login message that it worked.
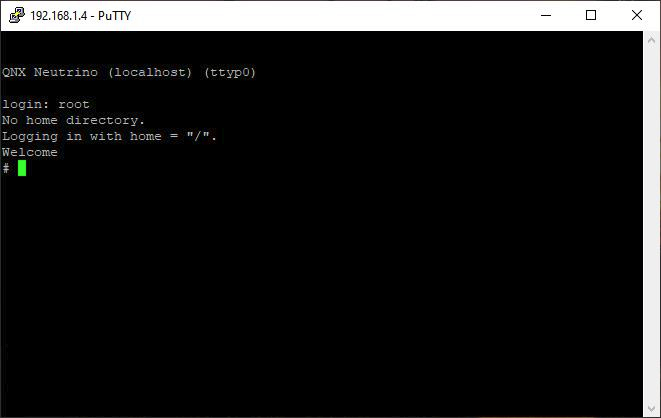
Only the word root (NO password) is required as a login to Delphi units.
As soon as Welcome is shown, commands can be entered.
Patch unit
Common shell commands:
cp= copyrm= deletechmod= change rights (e.B. chmod 777 = full read/write permissions)mkdir= create directory (folder)mount= mount pathumount= unmount path&&= execute another command
Attributes:
-f= force (overwrite / force)-R= recursive (e.B. copy/delete folder including contents and subfolders)-t= mount request / special type (e.B followed by qnx6)-u= update (remount)-V= progress indicator-w= read/write permissions (when mounting)
Create backup - recommended
It is important to create a backup before starting to patch!
Insert empty the SD card into SD 1 port and execute the following commands via putty.
Enter the commands exactly!
Unintentionally set spaces can lead to bricking of the unit!
This note is especially relevant for users who use a translator because they partially insert unwanted spaces.
Manual input
-
Mount SD card
cd / && mount -uw /sdc1/ -
Create backup folders on the SD card
mkdir /sdc1/backup/ -
Securing FEC Containers
cp -VRf /persistence/SWaP/* /sdc1/backup/ -
Save ifs
cp -Vf /extbin/apps/bin/delphibin.ifs /sdc1/backup/delphibin.ifs -
Back up the installation manager
cp -Vf /ffs/sbin/InstallationManager /sdc1/backup/InstallationManager -
Save profiles
cp -Vf /ffs/etc/profile /sdc1/backup/profile -
Save Config
cp -Vf /extbin/apps/cfg/MHConfig.cfg /sdc1/backup/MHConfig.cfg -
Back up fs0
cat /dev/fs0 > /sdc1/backup/fs0 -
Save Unit Info
APUpdateLight -i >> /sdc1/backup/unit_info.txt -
Save eMMC serial number
sdtool emmc info >> /sdc1/backup/emmc_serial_number.txt
Script version
This script has to be copied to SD card and executed by typing \n cd / && /sdc1/MST2_backup.sh
#!/bin/sh

echo "ROOT access - OK"
cd / && mount -uw /sdc1/; sleep 1

echo "Making backup dir on SD Card - OK"
mkdir /sdc1/backup/; sleep 1

echo "SWaP *.fec files backup - OK"
cp -Rf /persistence/SWaP/* /sdc1/backup/; sleep 1

echo "backup /ffs/etc/* - OK"
cp -Rf /ffs/etc/* /sdc1/backup/; sleep 1

echo "delphibin.ifs backup - OK"
cp -f /extbin/apps/bin/delphibin.ifs /sdc1/backup/delphibin.ifs; sleep 1

echo "InstallationManager backup - OK"
cp -f /ffs/sbin/InstallationManager /sdc1/backup/InstallationManager; sleep 1

echo "SWaP engine backup - OK"
umount -f /persistence && mkdir /home/mmc0t180_tmp && mount -t qnx6 /dev/mmc0t180 /home/mmc0t180_tmp && cp -Rf /home/mmc0t180_tmp/SWaP/* /sdc1/* && umount -f /home/mmc0t180_tmp && rm -R /home/mmc0t180_tmp; sleep 1

echo "profile backup - OK"
cp -f /ffs/etc/profile /sdc1/backup/profile; sleep 1

echo "MHConfig.cfg backup - OK"
cp -f /extbin/apps/cfg/MHConfig.cfg /sdc1/backup/MHConfig.cfg; sleep 1

echo "fs0 backup - OK"
cat /dev/fs0 > /sdc1/backup/fs0; sleep 1

echo "Saving unit info to file - OK"
APUpdateLight -i >> /sdc1/backup/unit_info.txt; sleep 1

echo "emmc serial numbler - SAVED"
sdtool emmc info >> /sdc1/backup/emmc_serial_number.txt; sleep 1

echo "FINISHED - You can now remove SD Card"
SWaP (FEC) patch
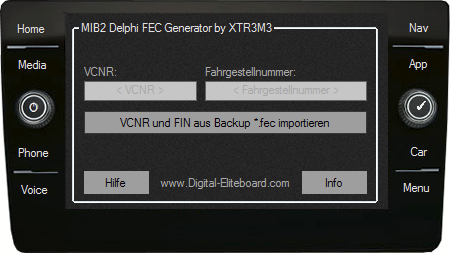
This patch is required to disable the verification of the signature of the FEC containers. \n Open MIB2 Delphi FEC Generator by XTR3M3 and select the appropriate featureenablecodes as desiredand thencreate/save the FEC container (right button). The VCNR and VIN can either be entered manually or imported from an existing (backup) FEC container.
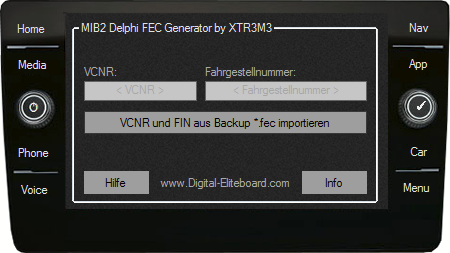
However, an already patched FEC container can also be easily changed with your VCNR and FIN.
This *.fec file and patched SWaP will be copied to SD card and insert it into slot 1 of the unit.
First, the patched SWaP file is copied to unit.
Enter the commands exactly! Unintentionally set spaces can lead to bricking of the unit! This note is especially relevant for users who use a translator because they partially insert unwanted spaces.
MST2_patch.sh - manual input
-
SD card mount
cd / && mount -uw /sdc1/ -
Temporarily mount path and copy SWaP file
umount -f /extbin && mkdir /home/mmc0t177_tmp && mount -t qnx6 /dev/mmc0t177 /home/mmc0t177_tmp && cp -VRf /sdc1/SWaP /home/mmc0t177_tmp/apps/bin/ && chmod 777 /home/mmc0t177_tmp/apps/bin/SWaP -
Temporary path unmount
umount -f /home/mmc0t177_tmp -
Delete temporary path
rm -R /home/mmc0t177_tmp
MST2_patch.sh - script version
This script has to be copied to SD card and executed by typing \n cd / && /sdc1/MST2_patch.sh
#!/bin/sh

echo "ROOT access - OK"
cd / && mount -uw /sdc1/;  sleep 1

echo "SWaP patch - OK"
umount -f /extbin && mkdir /home/mmc0t177_tmp && mount -t qnx6 /dev/mmc0t177 /home/mmc0t177_tmp && cp -VRf /sdc1/SWaP /home/mmc0t177_tmp/apps/bin/ && chmod 777 /home/mmc0t177_tmp/apps/bin/SWaP;  sleep 1

echo "Unmounting TEMP directory - OK"
umount -f /home/mmc0t177_tmp;  sleep 1

echo "Deleting TEMP directory - OK"
rm -R /home/mmc0t177_tmp;  sleep 1

echo "FINISHED - You can now remove SD Card"
Restart unit by long pressing the power button. \n A reboot can be seen by the boot logo and short-term loud fan noises
Now the patched FEC container is copied to unit.
Enter the commands exactly! Unintentionally set spaces can lead to bricking of the unit! This note is especially relevant for users who use a translator because they partially insert unwanted spaces.
MST2_fec.sh - manual input
-
SD card mount
cd / && mount -uw /sdc1/ -
Temporary path mount
umount -f /persistence && mkdir /home/mmc0t180_tmp && mount -t qnx6 /dev/mmc0t180 /home/mmc0t180_tmp -
Delete original FEC Container
rm -Vf /home/mmc0t180_tmp/SWaP/pg/*.fec -
Copy patched FEC Container
cp -Vrf /sdc1/*.fec /home/mmc0t180_tmp/SWaP/pg/ -
Temporary path unmount
umount -f /home/mmc0t180_tmp -
Delete temporary path
rm -R /home/mmc0t180_tmp
MST2_fec.sh - script version
This script has to be copied to SD card and executed by typing
cd / && /sdc1/MST2_fec.sh
#!/bin/sh

echo "ROOT access - OK"
cd / && mount -uw /sdc1/;  sleep 1

echo "Mounting"
umount -f /persistence && mkdir /home/mmc0t180_tmp && mount -t qnx6 /dev/mmc0t180 /home/mmc0t180_tmp;  sleep 1

echo "Moving old *. FEC to ILLEGAL - OK"
cp -Vrf /home/mmc0t180_tmp/SWaP/pg/*.fec /home/mmc0t180_tmp/SWaP/illegal/;  sleep 1

echo "Removing old *. FEC - OK"
rm -f /home/mmc0t180_tmp/SWaP/pg/*;  sleep 1

echo "Installing new *. FEC - OK"
cp -Vrf /sdc1/*.fec /home/mmc0t180_tmp/SWaP/new;  sleep 1

echo "Unmounting TEMP directory - OK"
umount -f /home/mmc0t180_tmp;  sleep 1

echo "Deleting TEMP directory - OK"
rm -R /home/mmc0t180_tmp;  sleep 1

echo "FINISHED - You can now remove SD Card"
Config (CID) patch
This patch disables SD card check for navigation (aftermarket SD cards).
Enter the commands exactly! Unintentionally set spaces can lead to bricking of the unit! This note is especially relevant for users who use a translator because it can insert unwanted spaces into the translated text..
This script can be copied to SD card or just executed by typing
grep -v "MIBST" /extbin/apps/cfg/MHConfig.cfg > /tmp/MHConfig.cfg && cp /tmp/MHConfig.cfg /extbin/apps/cfg/MHConfig.cfg && sync
delphibin.ifs (CP) patch
This patch disables component protection check
Enter the commands exactly! Unintentionally set spaces can lead to bricking of the unit! This note is especially relevant for users who use a translator because it can insert unwanted spaces into the translated text.
-
Copy patched
delphibin.ifsthat corresponds to Train and unit type onto the root of SD card -
Insert SD card into
SD 1slot of the unit. -
Create backup of the original
delphibin.ifs: \ncp -Vfr /extbin/apps/bin/delphibin.ifs /sdc1/backup_delphibin.ifs -
Copy patched
delphibin.ifsto the head unit: \n cp -Vfr /sdc1/delphibin.ifs /extbin/apps/bin/delphibin.ifs -
Sync file system:
MountPathSync /extbin/apps -
Restart the unit
shutdown -S reboot
FEC Generator
References
DEB - [HOW TO] MIB2/MST2 Delphi Unit (MST2_VW_xxxxxD) patchen [FEC/SWAP/CID/CP]